PINNED
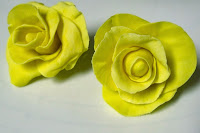
This past week we have been working on this rose tutorial we found on Pinterest. It has been out there a while and looked fairly easy so we though you might like to see it.
The website you can find here, it took me a few minutes to track down the original post and come to find out it is a clay tutorial. The written instructions are pretty clear. She wants you to start with 6 petals and then add 8 more for the bigger rose.
 |
SPIN the PIN
Here is a photo breakdown of how each step should look. The numbers represent how many petals should be cut for each step.
Each of the petals are shaped exactly the same. A circle is cut from the rolled out gumpaste, and then shaped using a dowel along the top edge of the circle. the edge is pressed outward along Jenn's finger.
ALL PETALS have glue (piping gel) along the bottom edge, and ALL STEPS are left to dry at least 15 to 30 minutes depending on your humidity. The first step is to roll the first petal around the wire.
Next, line the three petals up over lapping each other. Place the center of the rose seam side down and then roll up. Place some glue along the last edge and then pinch the bottom end.
Now, with the five petals, place them around the rose over the seams of the previous petals. Jenn likes to actually tuck her fourth petal in under the third petal(shown below). Don't forget ALL PETALS need to have the edges folded out to ensure a realistic appearance.
Finally, the seven petals just get glued all around the rose along the seam of the previous petals. If you have one or two petals left over, take a good look at your rose and place them where they would best balance out your rose.
You can continue with 11 petals and then 14 using a bigger circle cutter to make larger roses.
We hope you enjoy learning with us. If there is anything you would like to see let us know...
SPPIINNN!!!


No comments:
Post a Comment
NOTE: The Cake Spinners reserve the right to remove any comments with profanity, personal attacks, spam, or any other material that we deem inappropriate.